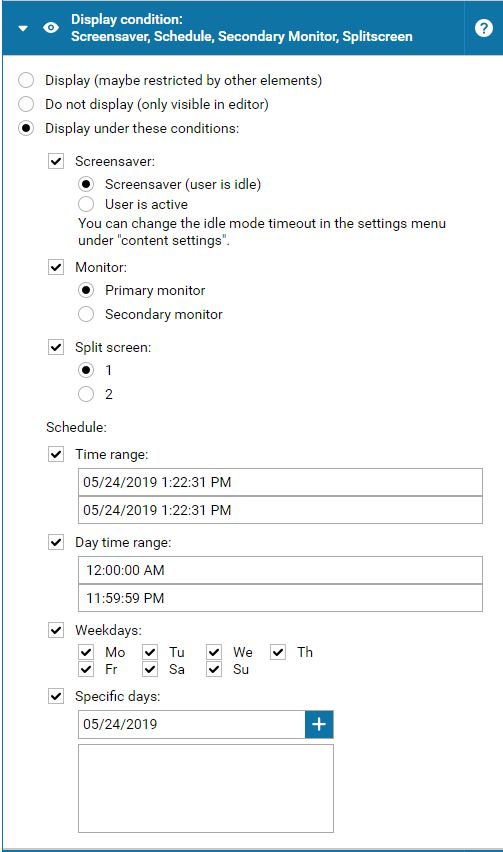
In the section
Screensaver following options can be configured:
- Screensaver (User is idle)
- User is active
In the Screensaver section, you can configure whether the display of specific elements or pages should be displayed depending on user interaction. In this way, you can for example display certain elements only when a user is active and a Sequence (slideshow) with images and videos in the idle mode.
Please note:
When using SiteCaster as the main application, you can change the idle time before activating the screensaver in the settings menu under Content settings. When using SiteCaster on a secondary monitor, in a screen split, or in a separate screen saver, the idle time before activating the screensaver is configured in the SiteKiosk configuration in the Screensaver section.
1.1.2 Monitor
The
Monitor option allows you to specify whether an element or a page is only displayed on the first or second monitor.
Please note:
To display SiteCaster content on a secondary monitor, SiteKiosk has to be configured accordingly in the SiteKiosk configuration under Startpage & Browser.
1.1.3 Split screen
The Split screen option allows you to specify whether an element or a page is only displayed on the first or second Split screen.
Please note:
To combine the Chrome Browser together with SiteCaster content in on screen, SiteKiosk has to be configured accordingly in the SiteKiosk configuration under Startpage & Browser - Split screen.
1.1.4 Schedule
In the section Schedule, the following options can be configured and combined with each other:
- Time range
- Day time range
- Weekdays
- Specific days
Using options of the Schedule- Display under these conditions section allows to precisely define a Time range (display period down to the second) during which an element should be displayed. This option can come in handy for example when you want to replace an element with another one at a specific time and date. In that case you can simply set the start date of the second element to the end of the first element's time frame. A simple example would be to switch from wishing your customers happy holidays during the Christmas season to showing a "Happy New Year" message on January 1st. You can easily plan these things in advance and have the schedule take care of it automatically. As well the Time section lets you define Day time range, a starting time from which an element should be displayed each day and a stopping time when the element is hidden again. You can use this method, for example, to switch between content you want to show in the morning and other content you want to show in the afternoon and evening. Simply create both elements and set the first element to show between 0:00 and 12:00 and set the second element to show between 12:01 and 23:59. With the Weekdays and Specific days function you can also configure elements to appear on certain or specific days. With the possibility to combine all functions of the time section all conceivable display conditions can be configured.
Please note:
All Schedule options in the display conditions can be combined with each other. If you want to display only one element per display condition in a container, you should use the swap container.
1.1.5 Test of display conditions
To test if your timed and event controlled elements show up the way you want them to, you can use the Preview. You can set a specific time and date for the preview windows which will be used instead of the real time. So if you want to test if elements properly appear/disappear at a certain time and date, simply set the time of the preview to a couple of seconds before the time you want to test. In addition, the preview's menu bar includes a button Set users idle to simulate event-driven display conditions. The drop-down menus Monitor and Split screen allow you to simulate the display conditions concerning monitor and split screen.